Looking to learn how to swing a golf club? We’ve split the golf swing into 8 sections — covering everything from setup, to the full swing — with video tutorials for each part of the swing.
Jump To Section
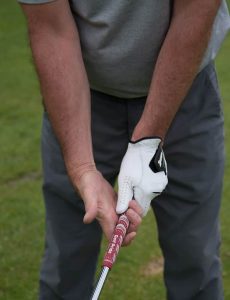
1. The Grip

I personally use an interlocking grip, which connects my right pinky to my left index finger.
Grip pressure should be light and constant throughout the entire swing.
Here is a great video from Me And My Golf, which runs through how to grip the golf club in detail.
2. Setup: Posture And Stance
The biggest issue that affects most beginner golfers when it comes to posture is slouching over the ball, curving the spine.
The back should be kept reasonably straight, and you should bend at the waist, with a slight flex in the knees.
In terms of stance width, a good rule of thumb is shoulder width apart for short to mid irons, and progressively wider with long irons, hybrids, woods, and driver.
The ball should be positioned off of your left heel for most shots, but with the driver it should be slightly forward in your stance.
I find the best way to set up is with my feet together and the ball in the centre. I then take a short step to the left for every club (apart from the driver), an equal step to the right for short to mid irons, then a wider step to the right for longer irons, driver etc.
For the driver I just flare my left foot out and then step with my right foot.
The left foot should be flared about 45 degrees or so towards the target, and the right foot should be square to the target line.
Weight should be distributed evenly between both legs, and on the balls of your feet (or if anything towards the heel).
Rotary Swing has some great videos on posture and stance.
And here is a video from Me And My Golf on ball position.
3. Setup: Alignment
Most beginner golfers will benefit most from setting up square to the target line.
That means that the feet, knees, hips, and shoulders should all be parallel to the target.
The reason they should be parallel to the target is that the golf club is in front of the body. If you set up with your knees, hips, and shoulders aiming at your target, then your club will be aiming to the right!
Here is a great video from Mark Crossfield which explains how to properly align to your target.
4. The Takeaway
Often described as the most important part of the golf swing, the takeaway is the first move away from the golf ball, up to the point where the golf club is parallel to the ground.
A good takeaway will lay the foundations for a solid, repeatable golf swing.
While there are a number of ways to conduct the takeaway, most methods advocate that it is done in ‘one piece’. That means that the arms stay in front of the chest as the body turns.
A disconnected takeaway, where the arms go behind the body will cause the club to turn too far to the inside and cause all sorts of problems in the rest of the swing.
I find the best way to stay connected in the takeaway is to concentrate on turning my right shoulder behind me, while keeping my forearms lightly pinned to my chest.
Here is Chuck from RotarySwing.com explaining how to do it.
5. Completing The Backswing
Once you get the takeaway down, you should be in good shape for a solid backswing.
From the halfway back parallel position, it’s simply a case of cocking your wrists, and continuing to rotate your body and shoulders away from the target.
Again, Chuck from the RotarySwing.com does a good job of explaining the rest of the backswing.
One thing I should point out here is that you should always rotate on your backswing, and never sway off the ball to the right. Your right leg should remain flexed and you should rotate around it.
I like to dig my right heel into the ground and feel like I’m turning it clockwise (without actually moving it) to keep my right leg secure and prevent a sway.
6. The Transition
Once you get to the top of the backswing, it’s time to come back down and hit the ball!
But actually hit is the wrong word. Because what you don’t want to do is rush from the top.
And in fact, you want to avoid the feeling of trying to ‘hit’ the ball with your right arm as that will cause your shoulders to spin out, resulting in a slice or a pull.
The first move from the top of the backswing should be a shift of the weight to your left side with your lower body.
As you do this you should try and keep your top half back, which creates separation between your upper and lower body, resulting in a ton of effortless power and speed.
The weight shift should be triggered with a slight lateral hip bump towards the target.
A great drill to ingrain the proper hip bump and weight shift is the 9 to 3 drill below.
7. The Release
If you have properly shifted your weight from your right side to your left at the start of the downswing, then the rest of the swing should be pretty much automatic.
But one thing to make sure of is that you maintain the connection between your arms and body during the downswing, and that you fully release the club to the target.
Again, the 9 to 3 drill will help to ingrain the feeling of a full release.
8. Keep Your Head Behind The Ball And Hold Your Finish
Keeping your head down is not particularly good advice in the golf swing.
It encourages players to push their chin into their body, causing a slumped posture and making it difficult to rotate. Your chin should be far enough away from your shoulders to allow them to pass underneath.
But what is important is to keep your head behind the ball until well after impact. If you’ve watched the 9 to 3 drill above (yes, it’s that good!), then you’ll know why that is important.
Finally, after release, swing through to a full, balanced finish and hold it. Your weight should be fully on your left side and you should feel tall, strong and stable.
Watch the ball fly to the target and get ready to do it all again!
- Next: How To Chip A Golf Ball: Simple, Step-By-Step Method
- Previous: Golf Etiquette: Tips To Keep Your Playing Partners Happy


