How to Draw a Bicycle in 5 Simple Steps
To draw a bicycle in 5 simple steps, start by gathering your drawing tools like pencil and paper. Drawing a bicycle might seem tricky at first, but with the right approach, it’s easier than you think.
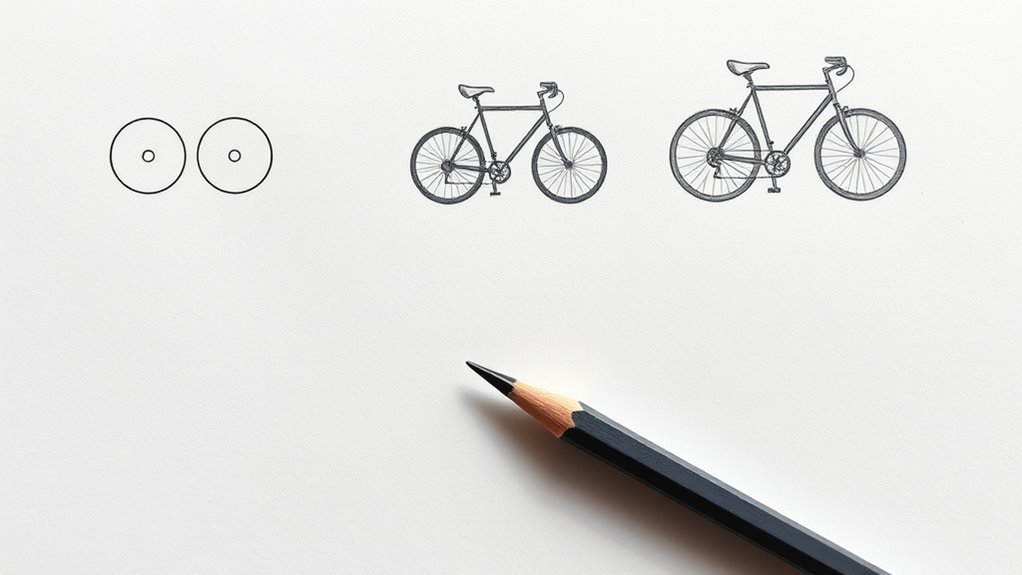
First, sketch two equal-sized circles for wheels and connect them with straight lines to form the frame. This basic structure gives your bike shape and balance.
Next, add handlebars, a seat, and pedals in the right positions. These details bring your bicycle sketch to life and make it look realistic.
Then, draw spokes radiating from the wheel hubs and sketch the chain connecting the pedals and sprockets. These small touches add depth and authenticity.
Finish by outlining with a pen and coloring—keep going, and you’ll discover how to add even more realistic touches. Have fun with it and enjoy the process!
Gather Your Drawing Materials
Before you begin sketching your bicycle, gather all the necessary drawing materials to make the process smooth and enjoyable. Start with a sheet of drawing paper that has a smooth surface, which helps your pencil glide easily.
Gather smooth drawing paper to ensure your pencil glides effortlessly as you sketch your bicycle.
Choose a sharp pencil for clean lines and easy corrections while sketching. Keep an eraser handy so you can quickly fix any mistakes or refine your outlines without hassle.
Don’t forget a ruler or straightedge to draw precise straight lines for the bike’s frame and components. Having these materials ready before you start will keep your workflow efficient and stress-free.
Once you finish sketching, you can add color and detail with colored pencils, markers, or crayons. But for now, focus on gathering the essentials to set yourself up for success.
Sketch the Wheels and Frame
Once you have your materials ready, start by drawing two large circles side by side to form the wheels, making sure they’re the same size and aligned on the same baseline. Inside each wheel, draw a smaller circle at the center to represent the hub. This detail will help you add spokes later on.
Next, connect the wheels by sketching straight or slightly angled lines to build the frame. Use a diagonal line between the wheels for stability, then add more lines to form the top tube, seat tube, and chainstay. These lines create the bicycle’s basic structure and give it its recognizable shape.
Focus on connecting these elements smoothly so your bicycle looks balanced and sturdy. This step sets a solid foundation for the rest of your drawing. You’re off to a great start!
Add Handlebars, Seat, and Pedals
A key step in bringing your bicycle drawing to life is adding the handlebars, seat, and pedals. These parts connect the wheels and frame, giving your bike its recognizable shape.
Here’s how to draw them accurately:
Follow these simple steps to accurately draw the handlebars, seat, and pedals for a realistic bike.
- Draw the handlebars as a horizontal or slightly curved line attached to the front fork’s vertical stem. You can adjust the width and curve based on the style you want.
- Sketch the seat above the rear wheel using a small oval, rectangle, or saddle shape. Connect it to the frame with a vertical seat post.
- Add pedals as small circles or ovals at the ends of the crank arms, which extend from the bottom bracket near the rear wheel.
Getting these placements right will make your bicycle look balanced and realistic. It really helps enhance the overall drawing.
Include Details Like Spokes and Chain
Now that you’ve added the handlebars, seat, and pedals, you can enhance your bicycle drawing by including details like spokes and the chain. Start by drawing evenly spaced, short lines radiating from each wheel’s hub to the rim, creating the spokes.
Make sure these lines cross over slightly to mimic the real web-like pattern that adds stability. Next, sketch the chainring near the pedals and connect it to the rear sprocket with a continuous loop to represent the chain.
Don’t forget small details like the chain guard and sprockets for added realism. Keep all spokes and chain lines proportional to the wheel and frame, and refine them with darker lines or shading.
These precise touches bring your bicycle drawing to life with mechanical accuracy and depth.
Outline and Color Your Bicycle Drawing
Although your sketch already captures the bicycle’s form, you’ll want to use a black marker or pen to carefully outline the main shapes like the wheels, frame, handlebars, and seat. This clean outline will make your drawing pop.
Next, erase any leftover guidelines to keep your work neat. Finally, fill in colors to bring your bicycle to life and add shading for depth.
Here’s how to finish your drawing:
- Carefully outline and erase guidelines to create a clean outline.
- Fill in colors evenly, choosing shades that suit your style.
- Add shading to the tires and spokes, then highlight parts like the seat and handlebars to make them stand out.
These steps will give your bicycle a polished, vibrant look.
Conclusion
Now that you’ve drawn your bicycle, imagine the joy of riding it through a sunny park. Just like Mia, who sketched her dream bike and soon built it with her dad.
Your simple drawing can spark real adventures and creativity. Keep practicing these steps, and you’ll not only improve your art but also bring your ideas to life.
So grab your pencil again—your next masterpiece is waiting! Drawing a bicycle in 5 simple steps is just the beginning. With each sketch, you’re getting better and closer to creating amazing artwork and fun bike rides. Keep going!