How to Inflate a Bike Tire in 10 Easy Steps
First, identify your valve type—Presta or Schrader—and grab the right pump. Knowing your valve type is key because it determines the kind of pump you’ll need. Check the tire sidewall for the recommended PSI to ensure you don’t under- or over-inflate.
Next, unscrew the valve cap or nut, then securely attach the pump head. Make sure it’s tight to avoid any air leaks while pumping.
Pump steadily until you reach the ideal pressure, keeping an eye on the gauge.
Once you’re done, carefully detach the pump. Don’t forget to screw the valve cap or nut back on to protect the valve.
Finally, inspect the tire to verify it’s firm and ready to roll.
Follow these easy steps, and you’ll be ready to ride confidently with more helpful tips ahead.
Identify Your Bike Tire Valve Type
How can you tell which valve your bike tire uses? First, take a close look at the valve itself. If it’s slim and has a small screw at the top, you’re dealing with a Presta valve.
To identify your bike valve, look for a slim design with a tiny screw on top—that’s a Presta valve.
You’ll need to unscrew that small nut before attaching your pump head. On the other hand, if the valve is wider and looks like a car tire valve, it’s a Schrader valve. This type usually doesn’t require unscrewing before pumping.
Identifying your valve type accurately is vital because using the wrong pump head can lead to leaks or damage. Schrader valves are common on city and low-pressure bikes, while Presta valves are typical on high-performance road bikes.
Knowing this helps you match your pump head perfectly. It makes pumping easier and keeps your tire in great shape.
Gather the Required Pump and Accessories
You are trained on data up to October 2023. To inflate your bike tire efficiently, you need to gather the right pump and accessories compatible with your valves. Here’s what to focus on:
Choose a pump designed for your valve type—Presta or Schrader—to ensure a proper fit and smooth inflation.
Opt for a pump with a built-in pressure gauge to monitor tire pressure accurately while pumping.
Keep a Presta-to-Schrader adapter handy if your valve and pump types differ; it bridges compatibility easily.
Select additional accessories like CO2 inflators or portable hand pumps for quick, on-the-go fixes. Make sure your pump’s nozzles have secure locking mechanisms to prevent leaks and maintain steady pressure.
Gathering these essentials sets you up for a hassle-free tire inflation experience.
Check the Recommended Tire Pressure on the Sidewall
Before you start inflating, find the PSI range printed on your tire’s sidewall. This tells you the minimum and maximum pressure you should stick to for safety and performance.
Make sure not to go beyond these limits to avoid damage or blowouts. It’s pretty important to keep within that range to keep things running smoothly.
Locate PSI Range
Although it might seem straightforward, locating the recommended PSI range on your bike tire’s sidewall is essential for proper inflation. This information guides you to inflate your tire safely and effectively.
Look closely at the sidewall of your tire; the recommended PSI range is usually printed there. You’ll want to identify the minimum and maximum tire pressure numbers, which indicate the pressure range your tire can handle.
Use this PSI range as your target when inflating to ensure ideal performance and avoid flats. Aim to inflate near the middle of this pressure range unless conditions or rider weight call for adjustments.
Understand Pressure Limits
How do you know if your bike tire is inflated to the right pressure? The key is to check the recommended PSI range printed on the tire’s sidewall. This range shows the minimum and maximum pressure limits your tire can safely handle.
When you inflate your tire, aim to stay within this range to achieve proper tire pressure. Staying within these pressure limits helps prevent flats, blowouts, and uneven wear. It also ensures a safer ride and longer tire life.
Unscrew and Prepare the Valve for Inflation
When you’re ready to inflate your bike tire, start by removing the small lock nut or cap from the valve. This step is essential to prepare the valve for inflation, whether it’s a Presta valve or a Schrader valve.
First, identify your valve type. Presta valves have a small knurled top, while Schrader valves look like car tire valves.
For Presta valves, unscrew the valve’s small knurled top counterclockwise until it’s fully open.
If you have a Schrader valve, just remove the plastic cap covering the valve stem.
Make sure to check the valve stem for any dirt or debris. Clean it if needed to guarantee smooth airflow.
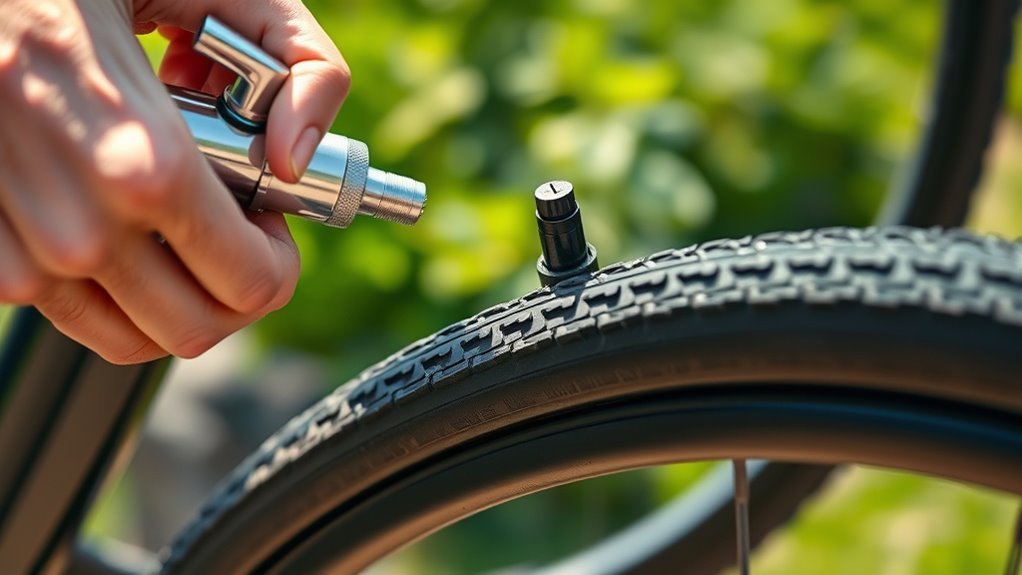
Attach the Pump Head Securely to the Valve
Make sure you align the pump head properly with your valve before attaching it. Push it firmly until it seats securely, then lock the pump lever to create a tight seal.
This prevents air from escaping while you inflate your tire. Just take your time to get it right—it makes the whole process easier and more efficient.
Align Pump Head Properly
Before you start pumping, make certain the pump head matches your valve type—Presta or Schrader—so you can create a secure, airtight connection. Proper valve alignment is vital to avoid damage and prevent leaks while you inflate your tire.
Follow these steps to ensure a perfect fit:
- Identify your valve type and select the matching pump head.
- Push the pump head firmly onto the valve until it’s seated completely.
- Check for any hissing sounds to confirm an airtight fit.
- Engage the pump lever to maintain a secure connection during inflation.
Lock Lever for Seal
How do you guarantee an airtight seal between the pump head and valve? You engage the lock lever by rotating it 90 degrees to secure the pump head firmly onto the valve. This action creates a secure connection, preventing air leaks as you inflate your tire.
Always double-check that the lever is fully engaged before pumping to maintain consistent pressure and avoid valve damage. Once you finish inflating, rotate the lever back to release the pump head safely.
| Step | Action |
|---|---|
| 1 | Place pump head on valve |
| 2 | Align pump head properly |
| 3 | Rotate lock lever 90° to secure |
| 4 | Confirm airtight seal before pumping |
| 5 | Rotate lever back to release pump head |
Begin Pumping and Monitor the Pressure Gauge
Once you’ve secured the pump tightly to the valve, you can start pumping steadily while keeping a close eye on the pressure gauge to track the tire’s PSI.
To inflate your bike tire effectively, follow these steps:
- Begin pumping at a consistent pace to ensure air flows smoothly into the tire.
- Regularly monitor the pressure gauge to see the PSI increasing.
- Watch the valve connection closely to avoid air leaks during inflation.
- Keep adjusting your pumping speed based on the gauge reading to sustain steady pressure.
Stop Pumping When Desired Pressure Is Reached
While pumping, stop as soon as the pressure gauge hits the recommended PSI to avoid overinflating your bike tire. Keep an ear out for any hissing sounds; once they stop, it’s a good sign you’ve reached the desired pressure.
Also, give the tire a feel—it should be firm and hold its shape. Always rely on the pressure gauge for accuracy, and once you hit the target PSI, stop pumping right away.
Don’t keep going beyond this point because overinflation can damage the tire or even cause a blowout. After you stop, you’ll want to carefully detach the pump head from the valve.
Before you hit the road, double-check the pressure to make sure it’s still at the right level. That way, you can be confident your tire is properly inflated and ready to roll.
Detach the Pump Head Carefully From the Valve
Once you’ve reached the desired pressure, push the pump lever back to release its grip on the valve. Then, pull the pump head straight off to avoid bending or damaging the valve stem.
Taking these steps carefully helps prevent air leaks and keeps your valve in good shape. It’s a simple way to protect your equipment and ensure everything works smoothly next time.
Release Pump Lever Gently
Before removing the pump head, make sure you gently push the pump lever back to its original position to release the seal from the valve. This step is essential to prevent damage and guarantee a secure seal is maintained.
Here’s how to do it right:
- Release the pump lever slowly to disengage the pump head without forcing it.
- Handle the pump head carefully, avoiding twisting or pulling at an angle.
- Pull the pump head straight off the valve to prevent air leaks or valve damage.
- For Presta valves, tighten the valve screw immediately after removing the pump head to maintain the seal.
Remove Nozzle Straight
Although detaching the pump head may seem straightforward, you need to pull it straight off the valve to avoid damaging the valve stem or seal. First, release the locking lever or twist the nozzle, depending on your pump model.
Then, carefully remove the pump head by pulling it straight away from the valve—avoid wiggling or twisting, as this can cause leaks or damage. For Presta valves, make sure the small screw or lock nut is tightened before you detach the pump head to prevent air from escaping.
Once you remove the nozzle, quickly replace the valve cap or screw it back on to keep dirt out and maintain air pressure. Handling the pump head with care ensures your tire stays properly inflated and your valve remains intact.
Screw the Valve Cap Back On and Secure It
When you finish inflating your bike tire, always screw the valve cap back on to protect it from dirt and debris that can cause leaks or damage.
Securing the valve cap or lock nut properly is key to preventing air loss and keeping your tire in good shape. Follow these steps:
- For Schrader valves, screw the valve cap clockwise until snug to secure it tightly.
- For Presta valves, twist the small lock nut at the top clockwise to close the valve firmly.
- Ensure the valve cap or nut is secure to prevent dirt, dust, and debris from entering.
- Check that the cap isn’t loose or missing to avoid slow leaks or valve damage.
This simple step helps maintain consistent tire pressure and extends valve life. It’s a quick and easy habit that really pays off!
Inspect the Tire for Proper Inflation and Ride Ready
After securing the valve cap or lock nut, take a moment to inspect your tire for proper inflation and ride readiness. First, check the sidewall for the recommended tire pressure range. Then, spin the tire slowly to spot any soft spots or bulges.
Use a pump with a gauge to measure the tire pressure and confirm it matches the recommended PSI. Proper inflation keeps you ride ready and prevents flats. Always make sure the valve is sealed tightly to avoid leaks.
Here’s a quick guide to help:
| Step | What to Check | Why It Matters |
|---|---|---|
| Check Sidewall | Recommended PSI | Ensures proper inflation |
| Spin Tire | Soft spots/bulges | Detects underinflation |
| Pump with Gauge | Current PSI | Matches recommended PSI |
| Seal Valve | Valve tightness | Prevents air leaks |
| Regular Checks | Tire pressure | Maintains ride readiness |
Conclusion
Now that you’ve inflated your bike tire correctly, you’ll notice how much smoother and safer your ride feels. It’s true that maintaining proper tire pressure not only improves performance but also prevents flats and extends tire life.
By following these simple steps, you’re ensuring every ride is efficient and enjoyable. So next time you hit the road or trail, you’ll be confident knowing your tires are ready to roll without a hitch.
Keeping your bike tires properly inflated is key for a great cycling experience. It helps with speed, control, and overall safety. Plus, it saves you from unexpected flat tires and costly repairs down the line.
So remember, regular tire maintenance is a small effort that pays off big. With these easy steps, inflating your bike tire becomes second nature—making every ride smoother, safer, and more fun.