How to True a Bike Wheel in 5 Simple Steps
Start by securing your bike wheel in a truing stand, making sure it’s centered and spins freely. This setup is key for accurately identifying any issues with your wheel’s alignment.
Next, look for side-to-side wobbles by observing any lateral deviations as the wheel spins. When you spot a wobble, adjust the spoke tension on the opposite side in small increments. This helps bring the rim back to the center without over-tightening.
After that, check for up-and-down bumps, which are radial deviations. Tighten or loosen the spokes as needed to smooth out these bumps and maintain a consistent wheel shape.
Finally, verify that the spoke tension is even all around. Give the wheel a spin to confirm it’s true and runs smoothly.
Following these simple steps will have your bike wheel perfectly trued, ensuring a safer and more enjoyable ride every time you hit the road or trail.
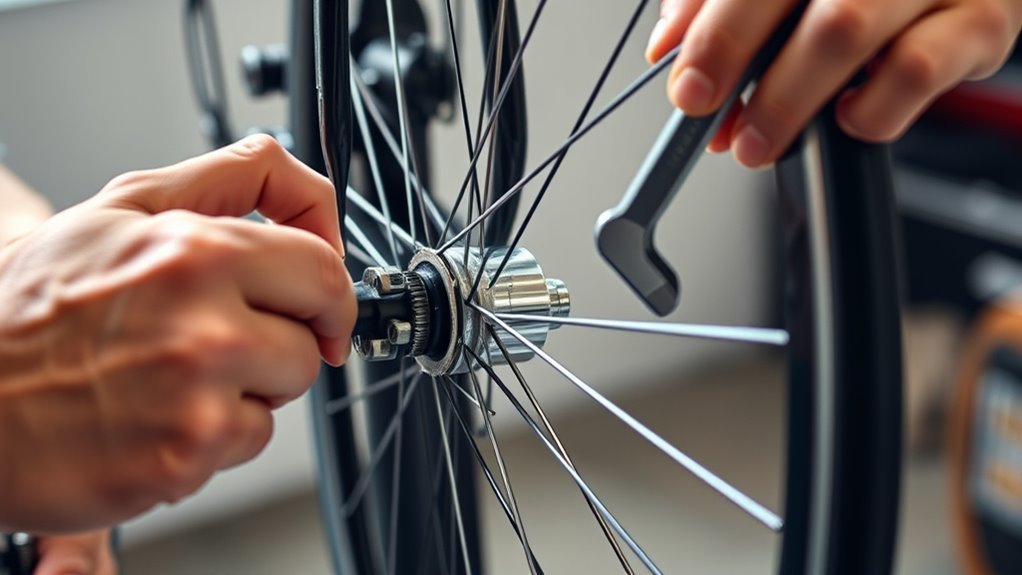
Secure the Wheel in a Truing Stand
Before you start truing your bike wheel, make sure to secure it firmly in a truing stand. Position the wheel so it’s centered and stable, preventing any movement during adjustments.
Secure your bike wheel firmly in a truing stand to keep it centered and stable before adjustments.
Adjust the stand’s clamps or supports to hold the hub securely, but avoid applying too much pressure that could damage the spokes or rim. Tighten the axle or quick-release skewer properly to maintain the wheel’s alignment and prevent wobbling.
Spin the wheel to confirm it turns freely and straightly before making any adjustments. Use the truing stand’s built-in indicators or attach a stationary reference point, like a zip tie, to monitor rim movement precisely.
This setup ensures you can identify deviations accurately and make effective spoke adjustments for a true wheel. It’s a simple step that makes the whole truing process a lot easier and more accurate.
Identify Lateral Deviations
To identify lateral deviations, spin your wheel and watch how the rim moves relative to a fixed point like the brake pads or a zip tie attached to the frame. Look carefully for any rim wobble that indicates the wheel isn’t side-to-side true.
Use the zip tie or a stationary indicator to measure the deviation by noting where the rim moves closest or farthest from your reference point. This deviation measurement reveals the areas needing lateral truing.
Focus on the spokes near the rim movement’s peak deviation, as adjusting their tension will help true the wheel. By identifying these lateral deviations precisely, you set the stage for effective spoke adjustment to restore proper wheel alignment.
This step is essential before you begin to true the wheel by tweaking spoke tension.
Adjust Spoke Tension to Correct Wobbles
Once you’ve pinpointed where the rim wobbles, start adjusting the spoke tension by tightening the nipples on the spokes opposite the deviation. Use a spoke wrench to tighten each nipple about a quarter turn, focusing only on those spokes pulling the rim back into alignment.
Make small, incremental adjustments—no more than half a turn per spoke—then spin the wheel to check if the wobble has decreased. To monitor progress, use a stationary indicator or tape to track the rim’s lateral movement after each adjustment.
Keep tightening and checking the spokes until the side-to-side wobble is reduced to less than 1-2mm. This careful, step-by-step approach guarantees you true the wheel precisely without over-tightening or damaging the rim.
Check and Correct Radial Deviations
While your wheel spins, watch closely for any high or low spots where the rim moves inward or outward—these indicate radial deviations that need correction. When the rim moves inward, the rim is too close, creating a high spot. When it moves outward, the rim is too far, causing a low spot.
Use a caliper or indicator to gently touch the rim at these points to confirm where the rim moves away from its true circle. The rim is out of round if you notice consistent rim wobble.
To fix high spots, tighten the spokes evenly around that area by about half a turn each, pulling the rim inward. For low spots, gradually loosen spokes in that section, then recheck to ensure the rim is more round and radial deviations are minimized.
Verify Spoke Tension and Final Wheel Alignment
After addressing radial deviations by adjusting spoke tension around high and low spots, you’ll want to verify that all spokes maintain consistent tension. Use a spoke tension meter, like the Park Tool TM-1, to check that spoke tension is even and within the recommended range. Aim for consistent readings across all spokes to ensure balanced stress.
Next, spin the wheel and observe for any wheel wobble, both laterally and radially. Perform a lateral true check and radial truing if minor adjustments remain. Confirm final alignment visually and with precise measurements, targeting less than 0.5mm of deviation.
Reassess spoke tension periodically during these steps to avoid uneven tension or over-tightening. Achieving even tension and proper wheel alignment guarantees a smooth, durable ride without unwanted wobble or stress.
Conclusion
Now that you’ve mastered truing your bike wheel, you’re just steps away from riding smoother than a breeze on a summer day. With a little patience and these simple adjustments, you can fix even the wildest wobbles that seem impossible to tame.
Remember, perfect spoke tension and alignment aren’t just about a smooth ride—they’re about making your bike feel like an extension of yourself. Keep practicing, and you’ll conquer every twist and turn with confidence!
Truing a bike wheel might seem tricky at first, but with these five simple steps, you’re well on your way to a safer, more enjoyable ride. Whether you’re fixing minor wobbles or major bends, consistent spoke tension and precise wheel alignment are key. So grab your truing stand, tighten those spokes carefully, and enjoy the satisfying smoothness of a perfectly true wheel. Happy riding!