How to Draw a Bike in 7 Easy Steps
To draw a bike in seven easy steps, start by gathering your paper, pencils, and colors.
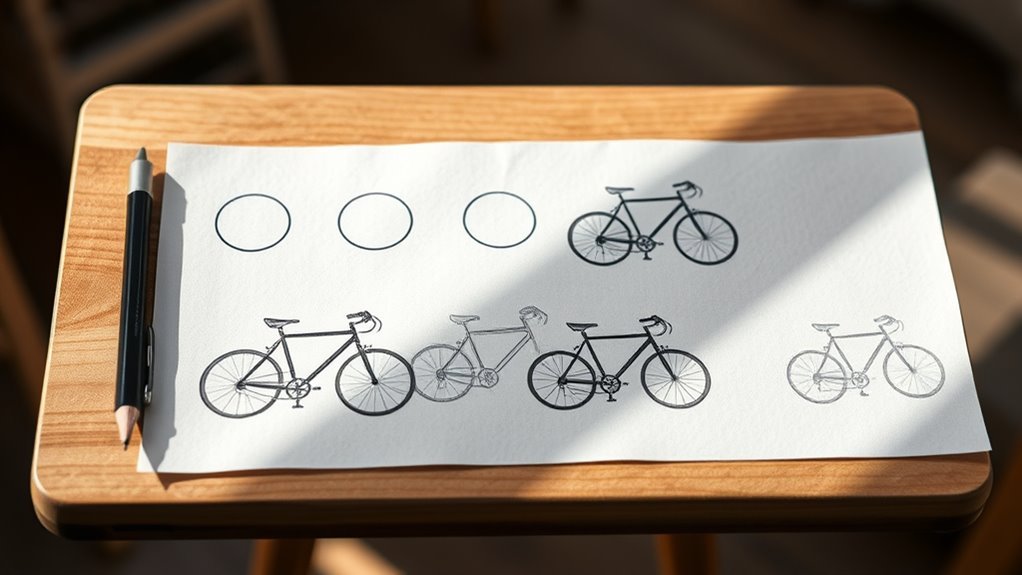
Sketch two circles side-by-side for the wheels, then lightly connect them with a simple frame outline.
Next, add the handlebars and seat in proportion.
Follow this by drawing the pedals and chain details to give your bike some character.
Outline your sketch with a black marker, then color it neatly to bring your bike to life.
Keep going, and you’ll discover tips to add cool details and polish your drawing beautifully.
Gather Your Drawing Materials
Before you begin drawing your bike, gather all your materials to guarantee a smooth process. Start with high-quality paper that has a smooth surface—it helps you create cleaner lines and makes coloring easier.
Next, choose your drawing materials carefully. Colored pencils work great for adding vibrant hues and fine details, but you can also use crayons or markers depending on your style.
Keep a sharpener nearby to maintain pencil sharpness for intricate parts. Having a variety of colors in large packs ensures you’ll have enough options to customize your bike’s design exactly how you want.
Finally, grab a fine-tip black marker or Sharpie to outline your sketch, giving your drawing bold, clean lines that really make it stand out. Easy, right? Just having the right tools makes a big difference!
Draw Two Circles for the Wheels
Start by sketching two large circles side by side to form the bike’s wheels. These circles represent the front wheel and rear wheel, vital for your bike drawing. Use a pencil to lightly sketch so you can easily make adjustments.
To make your bike drawing accurate, draw the circles evenly sized and aligned horizontally to keep proper proportions. Space them appropriately based on the bike frame size you plan to add later.
Also, mark small centers inside each circle to show the hubs or axles. These help connect the wheels to the frame.
Following these steps ensures your wheels look balanced and realistic before moving on to the next part of your Draw a Bike tutorial.
Connect Wheels With the Bike Frame
Now that you have the wheels in place, make sure they’re aligned precisely before sketching the frame connections. Use straight and curved lines to link the wheels, forming the bike’s main structure.
Pay attention to angles and proportions to capture the bike’s natural slant and shape. It really helps to take your time here to get everything just right.
Align Wheels Precisely
When you connect the wheels to the bike frame, use a ruler to draw a diagonal line between their centers to guarantee precise alignment. Make sure the wheels sit on the same horizontal level; this keeps the bike balanced and realistic.
The bike seat is another important part of the bike, but here your focus is on the wheels’ alignment to ensure the frame connects properly.
Follow these steps to align wheels precisely:
- Check that the distance between wheels matches the frame size for accurate proportions.
- Adjust angles so wheels align symmetrically with the frame’s edges.
- Use a straightedge to confirm the wheels’ centers line up diagonally, ensuring stability.
This precision makes your bike drawing look authentic and well-constructed. It’s all about those small details that bring your work to life.
Sketch Frame Connections
With the wheels aligned precisely, you can begin sketching the bike frame by connecting the front and rear wheels with a diagonal line to form the main structure. Next, draw the top tube by linking the handlebars area to the seat post, making sure the connection is smooth and natural.
Then, add the down tube, extending from the handlebar area down to the crankset or pedal section, providing stability. Don’t forget to sketch the chain stays and seat stays; these connect the rear wheel hub to the frame and add essential support.
Use light guidelines first to check angles and proportions, so your frame looks balanced. Once satisfied, go over your lines with a darker stroke to finalize the bike’s frame connections confidently. Easy, right? Just take it step by step!
Add Handlebars and Seat
Now it’s time to add the handlebars and seat to your bike drawing. Choose a handlebar shape that fits the bike style, whether curved or straight, and position the seat just above the rear frame.
Keep their sizes balanced with the wheels to make your bike look just right. This way, everything will come together smoothly and look great!
Handlebar Shapes and Styles
Although handlebar shapes come in various forms—straight, curved, or riser styles—they all affect how you ride and control your bike. When drawing handlebars, focus on their shape and how they connect to the stem to make your sketch realistic.
Each style suits different types of bikes and riding preferences.
Here are three common handlebar styles to contemplate:
- Straight Bars – Simple and practical, often seen on mountain bikes for stability and control.
- Drop Bars – Curved downward, ideal for road bikes to allow an aerodynamic posture.
- Riser Bars – Raised in the middle, providing a comfortable, upright position for casual rides.
Remember to add grips or accessories like bells to give your bike character without overcomplicating the drawing. Easy touches can make your sketch stand out!
Seat Positioning Tips
After choosing the right handlebar style, you’ll want to position the seat correctly to balance comfort and control. Start by drawing the seat slightly above the rear wheel, ensuring it allows a natural riding posture.
Represent the seat as a small rectangle or oval and attach it firmly to the seat post extending from the bike frame. Position the handlebars at the front of the frame, aligned with the seat to promote ergonomic comfort.
Make sure the seat height lets the rider’s legs bend slightly when pedaling, usually near hip level. Finally, connect the seat and handlebars with the frame’s top tube, maintaining proper proportion and alignment.
This step secures a realistic, comfortable bike shape for your drawing. It really helps bring everything together nicely!
Sketch Pedals and Chain Details
When you sketch the pedals, start by drawing small circles or rectangles attached to the crank arms extending from the center of the rear wheel. Next, focus on the chain connecting the pedals to the gear sprockets.
Draw a slightly curved line from the pedals to the rear wheel to represent the chain’s path. Add small oval shapes along this line to depict the chain links. For added realism, consider including a chain guard as a curved shape over the chain area.
To enhance your drawing further:
- Use shading or color differences to highlight the metallic texture of the pedals and chain.
- Keep the pedal shapes simple but proportional to the crank arms.
- Confirm the chain links are evenly spaced and consistent in size for accuracy.
Outline the Drawing With a Marker
Before you start outlining with a marker, make sure your pencil sketch is complete and clear. Grab a black marker and carefully trace over your entire drawing, focusing on the main shapes and important details.
Keep your lines smooth and continuous for a neat look. Press a bit harder around key features like the frame and wheels to create thicker, darker outlines that stand out.
Don’t forget to include finer elements such as spokes, pedals, and handlebars with sharp, precise lines to maintain clarity.
Once you’ve finished outlining, give the ink enough time to dry completely. Only then should you erase the pencil marks underneath to avoid smudging and keep your bike drawing crisp and clean.
Color Your Bike Drawing
Once your marker outlines have dried and pencil marks are erased, you can bring your bike drawing to life with color. Use colored pencils, crayons, or markers to fill in the different parts for a vibrant look.
Choose bright colors like red, blue, or yellow to make your bike stand out and look fun. To add depth and personality, try these tips:
- Experiment with shading techniques to create a more realistic appearance.
- Personalize your bike by adding decals, racing stripes, or custom colors that reflect your style.
- Color neatly within the lines to keep your artwork polished and attractive.
Go ahead and have fun with it! Your bike drawing will really pop with your own creative touch.
Conclusion
Now that you’ve brought your bike drawing to life, imagine the freedom it represents—the wind in your hair, the open road ahead. Each line you’ve drawn is a step closer to capturing that joyful ride.
Remember, every artist started just where you are now, with simple shapes and a dream. Keep practicing, and soon your sketches will pedal off the page, ready to take you on countless adventures.
Drawing a bike is a fun and rewarding way to boost your creativity. So keep at it, explore different styles, and enjoy every moment of your artistic journey. Your creativity has no limits!